SSL, or Secure Sockets Layer is the standard protocol used to establish a secure connection between a web server and a browser. In friendly terms, this means that any information passing from one source to the other is encrypted and can only be decrypted by the intended party. The data will be rendered unreadable by anyone maliciously snooping on the back-and-forth traffic.
As part of your Kayako Classic OnDemand instance, your helpdesk is currently protected by a “wildcard” SSL certificate. This certificate covers our domain (www.kayako.com) and any sub-domains we have (www.[yourdomain].kayako.com.)
That said, we know you've spent a lot of time (and money!) building up your brand and we also know that a large part of that is your online presence — including your website domain. That’s why we’ve added the capability for OnDemand customers to use custom SSL certificates for their own support domains. Coupled with our footer link removal package, you can now retain the company branding that your customers know and love, while still receiving the world-class functionality, support, and security that Kayako OnDemand provides.
Adding a custom SSL certificate to your OnDemand instance is available as a paid add-on. Reach out to sales@kayako.com to talk to someone about adding it to your OnDemand instance.
In this article, we'll walk you through the steps of adding a custom SSL certificate, once you've purchased the add-on.
Enabling your custom SSL for your OnDemand instance
One you've added the custom SSL add-on to your subscription, there are several steps you’ll need to go through in order to enable SSL for your OnDemand instance. Below, you’ll find detailed instructions.
Update your domain’s DNS records
First, you’ll need to make a few adjustments to the DNS records for your domain. You’ll need administrative access to your domain host.
To update your DNS records:
- Log in to your domain host and navigate to the DNS records for your site.
- In order to ensure that your changes are propagated as quickly as possible, edit the TTL (Time To Live) for your domain so it is as low as it will go.
- Next, you’ll need to create a new CName record to point your custom helpdesk subdomain (e.g., support.[yourcompany].com) at the subdomain for your OnDemand instance ([yourcompany].kayako.com).
- The steps for this process will vary, depending on your host, but the new CName record should look something like this:
- Record Name: ‘support.[yourcompany].com
- CName Host: ‘[yourcompany].kayako.com
- Once you’ve created the new record, it can take 24-48 hours for the DNS changes to propagate around the internet, which means some of your customers may be unable to view the helpdesk during that time. However, if you’ve set the TTL as low as you can, as we recommend above, that will help speed things up.
Provide your SSL certificate
You’ll need to provide our support team with a copy of your SSL certificate, so they can add it to the server where your OnDemand instance lives. You should be able to download a copy of your SSL certificate from your domain host.
In order for our team to enable SSL, your certificate must:
- Be for the correct domain (the one being used in the CName record you just added).
- Have a valid date, which does not expire for at least another month.
- Be from a trusted Certification Authority.
- Be downloaded and provided to us in a format for Linux/Nginx.
- Contain both the private and public keys.
Once we have your certificate, reach out to our support team, so we can add it to your OnDemand instance and let you know when it’s ready to go.
Update your settings in Kayako Classic
Finally, once your DNS changes have taken effect and our team has added your SSL certificate, you’ll need to update the base URL for your support site:
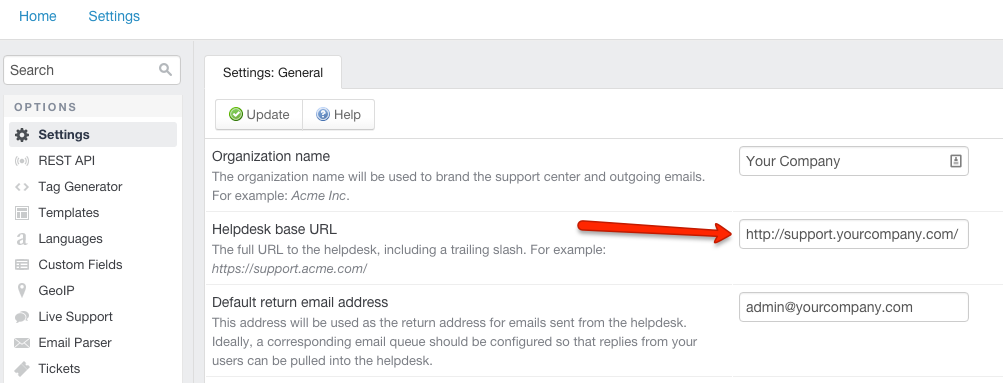
- Log into the Kayako Classic admin control panel.
- On the menu sidebar, click Settings.
- From the list, select General.
-
Next to ‘Helpdesk base URL’ enter the URL for your custom domain (e.g., support.[yourdomain].com).
-
Click the Update button to save your changes.
Kelly O'Brien