Service Level Agreements (SLAs) are a really useful tool for achieving good customer service. In Kayako, you can build SLAs that set time limits for either ticket replies or ticket resolution. This gives you an easy way to track which tickets need the most immediate attention.
The other part of the SLA equation is escalations. An escalation is an action or set of actions that Kayako can perform automatically, when a support ticket has failed to meet an SLA.
Understanding how SLAs come together in Kayako
The process for establishing an SLA in Kayako follows three basic steps:
- Adding your support team’s schedule to Kayako.
- Establishing an SLA to track your team's targets for response or resolution times.
- Creating an escalation that acts on support tickets that don't meet their SLAs.
Kayako calculates whether a ticket has breached an SLA's time limits based on your team's working hours. Let's say your support team keeps daily office hours from 9:00 A.M. - 5:00 P.M, which is 8 hours. If you use an SLA plan with a 24-hour reply time, that means that any ticket with that particular SLA must be replied to within 24 working hours. In other words, your team would have 3 working days (8*3=24) to reply to that ticket.
For any ticket that is not replied to within that time frame, you can create an escalation that will make sure your team follows up on it. Escalations can perform a variety of actions like changing the ticket's priority, assigning it to a particular staff user, or moving it to another department.
Keep in mind, too, that you can set up different SLAs to handle different types of support tickets. For example, you could use tags to distinguish simple 'how-to' requests from more complex 'network configuration' issues, and then set up separate SLAs to handle each. 'How-to' tickets might have a 2-hour reply time because they're relatively easy to address, while 'network configuration' issues might have a 6-hour reply time, since they'll take more time to investigate.
In the section below, we'll walk you step-by-step through the process of setting up a new SLA. As an example, we're going to set it up for a team that provides support from 9:00 AM - 5:00 PM, Monday-Friday, with weekends off. In that timeframe, we want to ensure that any ticket marked 'High' priority is replied within 2 hours and resolved within 4 hours, at the max. Additionally, if a ticket misses either of them, we're going to make sure the ticket gets escalated by bumping its priority up to 'Critical' and sending an email to the staff member assigned to the ticket.
NOTE: If you're going to be adding an escalation, you'll need to make sure your server is set up to run cron(an automatic job scheduler). For OnDemand, send us an email at support@kayako.com we'll get you set up. For Download, you'll need to set it up by following the instructions over in our wiki.
Creating and configuring SLAs and Escalations
To add and configure an SLA and escalation:
- Log into the admin control panel.
- Click the SLA link on the sidebar.
- First, you'll need to define the team's work schedule, so Kayako knows what hours of the day should count toward the time limits. To do this, click Schedules.
- On this page you'll see the default work schedule that comes built-in. But we want to customize a new one, so click the New button in the upper right.
- In the Schedule Title field, enter a name for your schedule.
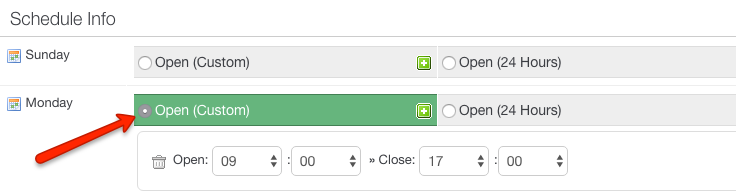
- As our example team is will be working from 9-5, Mon-Fri, we'll start by clicking the Open (Custom) radio button on the 'Monday' row.
- That will open up the option to define your Open and Close times. Select '9:00' and '17:00' respectively.
- Repeat that process the 'Tuesday' through 'Friday' rows.
- Click the Insert button at the top of the page to create your new schedule.
- Now that Kayako knows when our team is working, it's time to set up the SLA plan . Click the Plans link on the sidebar.
- Again, you'll see a list of any SLAs that have been created in Kayako so far. Click the New button to add a new SLA.
- In the SLA Plan Title field, enter a descriptive title for your SLA.
- In the Reply Deadline field enter '2' to set the two-hour target.
- In the Resolution Deadline field, enter as '4'.
- From the SLA Schedule dropdown, select the work schedule you created above.
- Leave SLA Plan Enabled set to 'Yes' to activate this SLA right away.
- Enter a '1' in the SLA Plan Sort Order field. This will tell Kayako to apply this SLA first, in any situation where more than one SLA applies to a ticket.
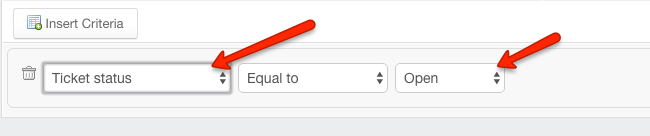
- Finally, you need to tell Kayako which tickets this SLA should apply to. Remember, in our example case, we want to apply this SLA to any open, high-priority tickets. In the first row, select 'Ticket Status' in the first dropdown and 'Open' in the third.
- To set the second criteria, click the Insert Criteria button, and select 'Ticket priority' in the first dropdown and 'High' in the third.
NOTE: As you can see, there are a lot of options for how to define the criteria for SLAs. It's worth taking note of the other options available here, for future SLA projects. - Click the Insert button to create your SLA plan.
- Our last big task is to tell Kayako what to do with tickets that don't meet the deadlines set in your SLA plan. Click the Escalations link on the sidebar.
NOTE: Remember, you'll need to have cron enabled on your server for the escalations to work. - Again, you'll see a list of any Escalations that have been created in Kayako so far. Click the New button to start a new Escalation Rule.
- In the Rule Title field, add a descriptive title for your escalation.
- From the SLA Plan dropdown, select the SLA plan you created above.
- From the Escalation Type list, select 'Either reply or resolution overdue' because we want the ticket to be escalated if it misses either of these deadlines.
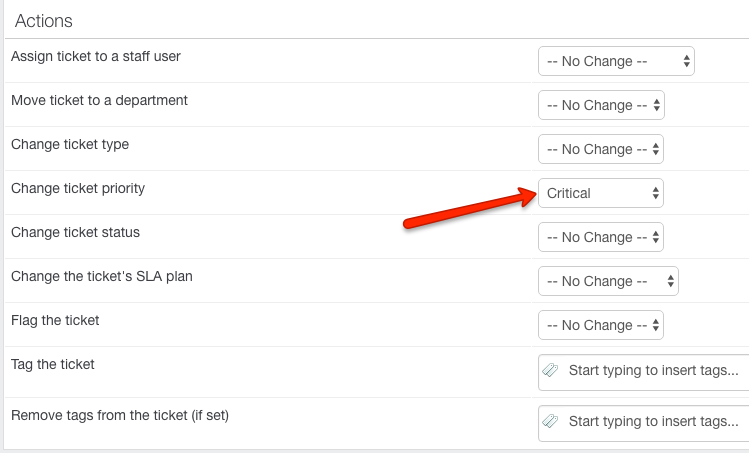
- In the 'Actions' section you can tell the escalation what actions to perform on the offending tickets. We just want to bump the ticket priority up a level so from the Ticket Priority dropdown, select 'Critical'.
- Finally, we're going to set a notification email to send whenever the escalation is applied.
NOTE: You can also set up broader rules for sending email notifications. Check out our user guide article about notifications to learn more. - At the top of the screen, click the 'Notification' tab.
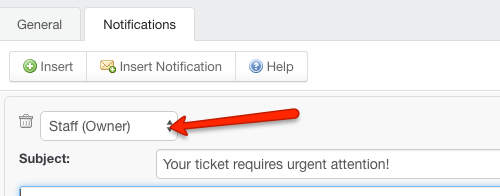
- On this tab, you can insert notification emails for various stakeholders. We're just going to set one up for the staff member assigned to the ticket. Click the Insert Notification button.
- Select 'Staff (Owner)' from the dropdown.
- Fill out the Subject field with the a subject line for the email, and add the body of the message in the text area below.
- When you're done, switch back to the 'General' tab.
- Review your escalation and click the Insert button to save and activate it.
- Congratulations, you've created a new SLA!

Sandeep Kaur