If there is one thing that can help solve support queries before they even reach you, it is a well-structured self-service portal. The most effective self-service portals are those that deliver a seamless customer experience, and a lot of that comes down to consistent branding between your product and your support. With Kayako, you can create multiple knowledge bases, each branded for a specific product line or subset of customers. In this article we'll explain how Kayako handles multi-brand knowledge bases and then walk you through the steps to creating your own.
Understanding how Kayako handles multi-brand knowledge bases
Kayako was designed to support multiple brand-specific front-ends all from one common back-end management interface. In order to make sure that your branded content appears in the right place, to the right audience, with the right formatting, there are several elements that need to be in place:
- You'll be creating new user groups for each brand you want to use. Kayako uses these to control the visibility of the different categories and articles.
- You'll also need to assign user accounts to the different user groups.
- To control the look of the branded support sites, you'll define a template group for each brand, and link those templates to the corresponding user groups.
- You'll build out categories for each brand and link them to a particular user group, so that any articles in those categories only appear on that brand's knowledge base.
- Finally, you'll update your support site links in order to route traffic to the knowledge base for a brand.
Once each of those elements is in place, your team will be able to write and publish self-service articles and easily restrict them to a particular branded knowledge base. Read on for detailed instructions for how to set up a multi-brand knowledge to support three example brands.
Building a multi-brand knowledge base
To create a multi-brand knowledge base:
- Log into the admin control panel.
- Click the Users link on the top toolbar, and then the Insert User Group link that appears below.
- Now, we're going set up set up a 'Guest' user group and a 'Registered' user group for each of three brands. So we'll need six user groups, all together:
- 'Guest - Brand A'
- 'Registered - Brand A'
- 'Guest - Brand B'
- 'Registered - Brand B'
- 'Guest - Brand C'
- 'Registered - Brand C'
- In the Group Name field, enter the name for the first group, 'Guest - Brand A'.
- In the Group Type field, select 'Guest'.
- Click the Insert button to save your new group.
- You'll end up out back on the 'Manage User Groups' page. Click the Insert User Group link to create your next group.
- This time, the Group Name should be 'Registered - Brand A'.
- For Group Type, select 'Registered'.
- Click the Insert button to save.
- Repeat the steps above to create the remaining four user groups—a 'Guest' and 'Registered' group each for Brands B and C.
NOTE: For the 'Guest' user groups , Kayako will determine which template to use for guest traffic, based on the URL they use to get to your help desk. More on that below. - Next, we need to populate each user group with the user accounts that belong to them.
- Click the Staff CP link in the upper right to switch to the staff control panel.
- Click the Users link on the toolbar.
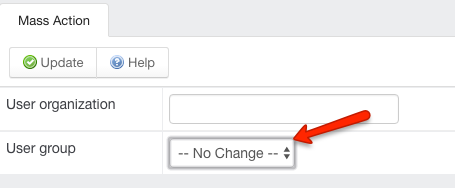
- On the 'Manage Users' page, find the customer accounts for 'Brand A' and check the box to the left.
- At the bottom of the screen, under the 'Mass Action' heading, select 'Registered - Brand A' from the User Group dropdown.
- Repeat the last two steps to add any customer accounts for 'Brand B' and 'Brand C' to the appropriate 'Registered' user group.
- Next, comes the templates, which control how the content in each brand appears on the support site. Because template customization is one of Kayako's most powerful features, we have an entire user guide article devoted to customizing the templates involved in branding a support center. Refer to the article above and follow those steps to create three new Template Groups:
- 'Brand_A'
- 'Brand_B'
- 'Brand_C'
- Make your modifications to the templates in each groups, again, following the steps outlined our article about using template groups to create a branded support experience.
- Now, we're going to link each template group to its corresponding user groups.
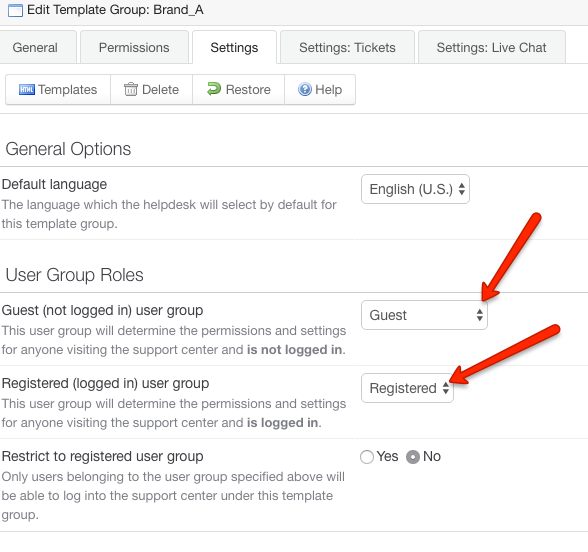
- From the admin control panel, on the 'Template Groups' landing page, click the title of the 'Brand_A' template group to edit it.
- From the Guest (not logged in) User Group dropdown, select the 'Guest - Brand A' user group.
- From the Registered (logged in) User Group dropdown, select the 'Registered - Brand A' user group.
- Repeat the last two steps for the 'Brand B' and 'Brand C' template groups.
- Finally, we're going to set up knowledge base categories to contain articles for each brand.
- Switch back to the staff control panel and click Knowledgebase on the toolbar.
- Next, click the Categories link and the Insert Category button to create a new knowledge base category.
- In the Category Title field, type 'Brand A'.
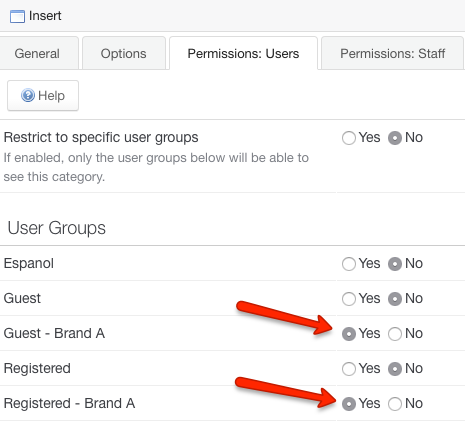
- Click the Permissions: Users tab at the top of the window.
- On this screen we can control which user groups will be able to view content in this category. In the Restrict to specific user groups select 'Yes'.
- Under 'User Groups' leave the rows for 'Brand A - Registered' and 'Brand A - Guest' on 'Yes', and set every other row to 'Now. This will display articles in this category only to Brand A visitors.
NOTE: You could choose to restrict the category to only the registered group, to limit articles' visibility to logged in users. - Click the Save button to create your new category.
- Repeat the steps above to create new categories for 'Brand B' and 'Brand C'.
- Now, when you create articles, you can save them in the category for the appropriate brand.
- The final step is to actually direct your customers to your branded support sites. You'll need to append the template group name to the end of your support site's URL:
- http://[yourkayakodomain].com/index.php?/Brand_A
- http://[yourkayakodomain].com/index.php?/Brand_B
- http://[yourkayakodomain].com/index.php?/Brand_C
- Any visitors to those URLs will see the branded support site, and whether they're logged in or not will control what content they can see.
- Congratulations! You've set up your Kayako to support multiple, branded knowledge bases. We know this has a lot of moving pieces, so please don't hesitate to contact support with any questions.
Gaurav Katal