Many areas of Kayako Classic prompt customers for information, but sometimes, the standard questions don't get you all the details you're after. For those situations, Kayako Classic has custom fields, which you can add to most customer-facing forms to request whatever information your team needs.
Custom fields allow you to expedite your support processes by cutting down on the back and forth with your customers. Meanwhile, they let you capture and store useful customer information to help you deliver an exceptional support experience.
In this article, we’ll go over how custom fields work in Kayako Classic, where they're available, and how to create them.
Understanding how custom fields work
Before you get started creating custom fields, there are a few things to understand about how they work.
First, every custom field belongs to a group, which you'll use to organize related fields and control where in Kayako Classic they are displayed. For each group, you'll add a title and select a location:
- User profile – Store additional customer details on their user profiles. Users will be prompted to fill in these fields when registering on your support center, and staff can fill them in when inserting or managing users from the staff control panel.
- User organization profile – Capture information about user organizations. These fields will be visible and editable by users when they fill in their organization details on their support center profile. Staff can also edit these fields under the 'Organizations' section in the staff control panel.
- Live chat (before chat) – Ask for specific details before letting customers start a chat conversation.
- Live chat (after chat) – Add questions to display in the live chat window when a conversation is completed. Use them to solicit specific ratings, feedback, etc.
- Staff ticket creation – Create custom fields on the form your staff will use when creating a new ticket from the staff control panel. These fields will not be visible to your customers.
- User ticket submission – Prompt your users for specific information when they're creating a new support ticket on the support center.
- Staff and end user ticket creation – Select this location to create a group of fields that will appear to both your staff and your end users, when they're creating new support tickets.
- Ticket time tracking / billing entry – Track detailed billing information by adding custom fields to the 'Billing' ticket tab in the staff control panel.
NOTE: Once a custom field group is created, you cannot change its location.
When you've created a field group or two, you can start to add the fields themselves. Kayako Classic supports a variety of different field types:
- Text – Small, single-line text box that allows users to enter a short string of text.
- Text area – Larger text area, spanning multiple-lines, that allows users to enter larger blocks of text.
- Password – Text box that masks any values entered, for security.
- Checkbox (multiple choices) – List of options with checkboxes next to them. Users can select multiple options.
- Radio Buttons (single choice) – List of options with radio button selectors. Users can select one option.
- Drop-down select (single choice) – List of options in a dropdown menu. Users can select one option.
- Multi-selection menu (multiple choices) – List of options in a menu. Users can select multiple options.
- Linked select (multiple choices) – Drill down menu that takes users through nested options, where they can make multiple selections.
- Date – Pop-up calendar that users can select a date from.
- File – Field where users can upload individual files.
- Custom – Blank field container that allows you to supply your own HTML for a form field.
After you've selected a field type, you'll be able not only to define the field's options, but also configure its behavior. You can control whether it's editable by users or just by staff. You can make it required. You can restrict the values it will accept by matching them to a regular expression. You've got lots of control here.
Now that you have a sense for what kinds of options you have, let's have a look at the steps for creating a new set of custom fields.
Inserting a new custom group and field
You can use custom fields to serve a lot of different purposes. For these instructions, we'll look at a common example – adding fields to the ticket submission form to capture the user's product type and serial number.
NOTE: To add custom groups and fields, you'll need an administrator account with the 'Custom field groups' and 'Custom fields' permissions.
- Sign in to the admin control panel.
- Click Custom Fields and then Groups in the sidebar.
- Click the New button in the upper right.
- First add a title for your new group, such as 'Product Details'.
- From the Custom field group location dropdown, select 'Staff and end user ticket creation.'
- Since you want customers to be able to use these fields, set Group Visibility to 'Public'.
- If you have multiple groups in the same location, you can use Display order to control the order in which they appear.
- When you're done, click the Insert button to create your group.
- Now we're ready for the fields themselves. Click Fields in the sidebar.
- Click the New button.
- We'll start with our 'Product' field. Select Dropdown select so we can limit users to the list of products we define.
- Click the Next button.
- From Custom field group select the 'Product Details' group to add it to the field group we just created.
- Add a descriptive name in Field Title, in this case 'Product'.
- In Field description, you can provide a little bit of explanatory text that will appear below the field.
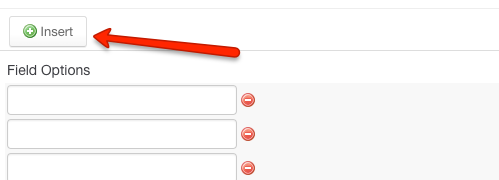
- In the Field Options list, enter the options your users can choose from.
- If you need more than the default eight spots, click the Insert button above the list:
- We have two more quick steps before we're done. Switch to the 'Options' tab, up top.
- Here, let's set Required field to 'Yes' to make our new field mandatory.
- And for Field editable by end users, select 'Yes' to let our customers make changes.
- Click the Insert button to save your new field.
- Next, let's add a 'Serial Number' field. Click New.
- From Custom field group select the 'Product Details' group.
- Select 'Text' for the field type, and click Next.
- In Field title let's go with 'Serial Number'.
- Add a quick bit of help text to the Field description.
- Switch to the 'Options' tab.
- Let's leave this field as optional, but make sure that Field editable by end users is set to 'Yes'.
- Click Insert to save the field.

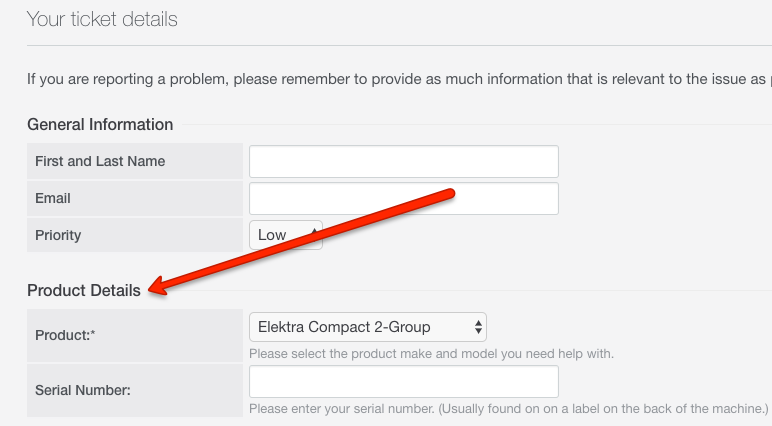
And that's it! Your users will now see the 'Product Details' section on the submission form whenever they go to create a new ticket from your support center:
Michael Caminiti