Many support teams sink a lot of time into handling common administrative support requests like equipment purchases or travel budget approvals. These requests go through a predefined set of steps that don't change from one request to the next. Using Kayako Classic's workflow feature, you can capture and streamline these procedures, saving your team valuable time and dramatically reducing the occurrence of human error.
Workflows are built to capture each step in a procedure so it can be followed exactly the same way every time, at the push of a button. Whether your process has 2 steps or a dozen, you can use workflows to keep your team and your tickets on track.
In this article we'll take you through an example of how you might use Kayako Classic workflows, and then walk you through how to create that example, step-by-step.
Understanding how to use workflows
Let's have a look at a specific example of how a team might use workflows so that we can understand how all the pieces come together. We'll go with purchasing new equipment, since it's a common use case for workflows.
So, when a new request comes in where someone wants to purchase a new piece of equipment, what steps does it need to go through? Let's say the support department needs to pass it to the finance team, and then finance will either approve or deny the funds for the request.
The flow of the issue would look something like this:
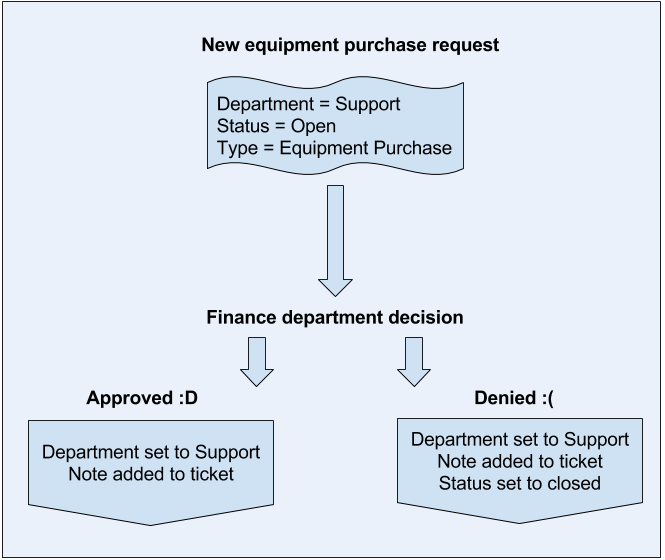
So, looking at the diagram, we've have a few things going on. There are two main parties involved – a support team member and a finance team member. We have a set of ticket criteria established – open 'equipment purchase' tickets assigned to the support department. And we have three total steps defined:
- When the issue comes in, the support staff member uses the workflow to assign the ticket to finance.
- When it lands with finance, they will either approve the request, which will return the issue to support and add a note about their approval,
- or they'll deny the request, sending it back to support, adding a note, and closing the issue.
In Kayako Classic, we can define a workflow for each one of these steps, and limit their visibility based on ticket criteria. Then, every time a purchase request comes in, the support team can move it along to finance with the press of a button, and finance can either approve or deny it.
Now, this example probably isn't an exact match for a process in your organization, but you can see how you might start mapping common procedures so they can be standardized with workflows. A great way to get started is to sit down with an actual pen and paper, and map out the steps of your real-world processes using flow diagrams. This makes it much easier to determine how many workflows you need and what each of them needs to do.
Read on for step-by-step instructions on how to create a set of workflows that would function as described above.
Creating a multi-step workflow
You'll build your workflows from the admin control panel, and your team will be able to execute from the staff control panel. When creating a workflow, you can define criteria that tickets must match, before the workflow will be available. Then you'll choose updates to apply to the ticket, when the workflow is executed.
So that you can get a feel for creating a batch of related workflows, we'll go through the steps for creating each of the three equipment purchase workflows we discussed above.
NOTE: To create workflows in Kayako Classic, you will need an admin account with the 'Workflows' permission.
So let's get cracking, and start in on our first workflow!
Workflow 1: Move ticket to finance for approval
- Sign into the admin control panel.
- Click on Workflow on the sidebar.
- Click the New button in the upper-right.
- Add a brief, descriptive title to the Workflow rule label box, like 'Purchase Request'.
NOTE: Make sure you use a name that's clear and accurate, as this text will be used when your team is executing the workflow on a ticket. - Leave Workflow is enabled set to 'Yes'.
- In Display order you can tell Kayako Classic where to sort the workflow in a list, with smaller numbers appearing higher on the list.
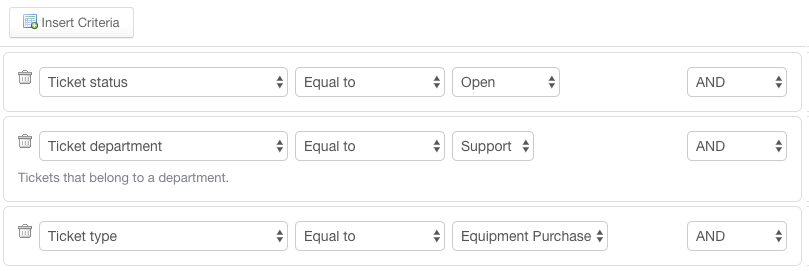
- Now, to add the criteria we want our tickets to match. We want to select for 'Open' tickets in the 'Support' department, of the 'Equipment Purchase' type. Click the Insert criteria button to add each of the three.
- When you're done, you rule criteria should look like this:
- Next, to add an action for the workflow to perform. In this case, we just want it to move the ticket to the Finance department. Click the 'Actions' tab.
- From the Move ticket to department dropdown, select 'Finance'.
- Now click the Insert button up top, to save your workflow.
And that's step one! Whenever a member of the support department is looking at a ticket that matches our criteria, this workflow will appear in the left-hand sidebar.
When they click it, the ticket will be moved to the finance department. Now let's set up some workflows to help the finance team respond.
Workflow 2: Finance approves purchase request
Once an equipment purchase request lands in the finance team, we want to make responding as easy as possible for them, so we'll set up a workflow to approve the request and another to deny it.
- Head to the admin control panel and click Workflows in the sidebar again.
- Click the New button.
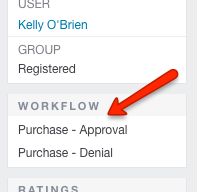
- In Workflow rule label box, add a title. Let's go with 'Purchase - Approval'.
- Enable the workflow, and set a display order.
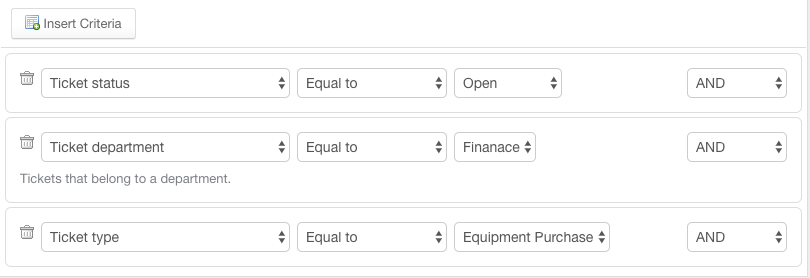
- Click the Insert criteria button three times, to create our criteria.
- For this one, we want We want to specify 'Open' tickets in the 'Finance' department, of the 'Equipment Purchase' type.
- The criteria for your new rule should look like this:
- Time to switch to the 'Actions' tab. We're going to have this rule move the ticket back to the support department and add a note letting them know the request is approved.
- From the Move ticket to department dropdown select 'Support'.
- In the Add a note to ticket text box, type the copy for your note, like 'Approved for purchase, enjoy!'
- Click Insert button to save the workflow.
Almost there, we just need to add one more for when finance turns down a request.
Workflow 3: Finance denies purchase request
The steps for this last workflow is nearly identical to the approval rule above, with just a few small but important adjustments..
- From Workflows in the admin control panel, click the New button one more time.
- For the Workflow rule label, let's use 'Purchase - Denial'.
- Set the same criteria we used above:
- Switch to the 'Actions' tab.
- From the Move ticket to department dropdown select 'Support'.
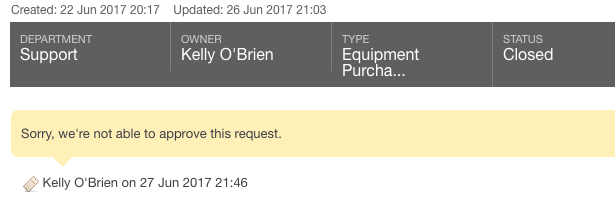
- In the Add a note to ticket text box, we'll add a denial message, like 'Sorry, we're not able to approve this request.'
- And finally, for denied requests, we'll use the Change ticket status field to set the ticket to 'Closed'.
- Click Insert button to save the workflow.
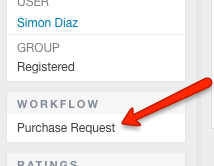
With these two workflows enabled, any member of the finance department who's viewing an equipment request ticket will see the following in the sidebar:
So the next time a team lead writes in requests a chocolate fountain to improve team morale, it will only take your support and finance teams a couple of clicks to take their ticket from the queue to here:
As you can imagine, there are many more situations where workflows can come in handy to streamline and standardize your team's practices. Experiment with the criteria available and the possible actions workflows can perform. Some of our favorites are emailing notifications to your customers or staff members and tagging tickets to give them extra context.
No matter what your team's procedures look like, Kayako Classic workflows are definitely worth exploring.
Gary McGrath