For most companies, the responsibility of handling support requests is divided among several different teams. In Kayako Classic, you can divvy up those support requests using departments. Splitting your tickets between multiple departments means each request is getting in front of the people best qualified to resolve it.
For each department, you can assign teams or staff members, set its visibility, and choose whether it handles chats or tickets. You can move tickets between departments either manually or using workflows, and you'll also have the option to set up notifications for your teams, when a new ticket gets moved into one of their departments.
In this article, we'll take you through how Kayako Classic departments work, and then walk step-by-step through creating and editing departments.
Understanding how departments work
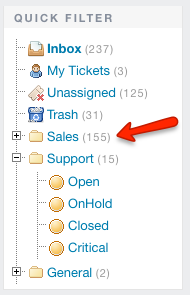
Think of Kayako Classic departments as buckets, which you can use to store different types of support requests. For each department-bucket you'll assign teams and/or individual staff members to it, so they can look after the requests that land in there. As you set up new departments, they'll show up in the sidebar of the staff control panel – broken down by ticket priority – so you can quickly switch between buckets.
When creating a department, the most important choice will be whether it's for support tickets coming in via email and your support center or for Live Chats conversations that you're having via Kayako Desktop. You'll also have the chance to choose whether it's visible to your customers – so they can choose it when submitting a ticket – or only visible to your staff.
Next you'll be able to choose teams and staff members to assign to it, and finally, add translations for the department name for any other languages you have enabled.
Once the department is set up, you have several options for adding requests to it. You can do it manually, while updating the ticket. You can do it automatically when a ticket comes in, using email parser rules. Or you can set up a workflow that your staff can use to quickly update and move tickets between departments.
Now that we've covered the department basics, let's have a look at creating a new one.
Creating and managing departments
Many Kayako Classic users create a dedicated departments for each of their staff teams. But you can add as many new departments as you need, and update them as your organizational needs shift. Below, we'll take you step-by-step through creating a new department.
NOTE: To create or edit departments, you'll need an administrator account with the 'Departments' permission.
To create a new department in Kayako Classic:
- Sign in to the admin control panel.
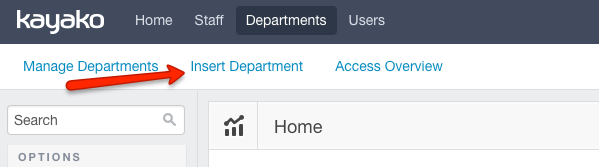
- Click on Departments option in the top navigation bar.
- Click on Insert Department.
- Enter a Department name first.
- You can skip over the Parent department, unless you have a huge collection of departments and want to nest them.
- Enter a value for Display order to tell Kayako Classic how to sort it with your other departments. The smaller the number, the higher it will appear in lists.
- Choose a Type for the department. 'Public' means customers will be able to see and select it when submitting a request. 'Private' means only your team will be able to see and select it.
- And finally, from Channel, select whether it's a department for Live Chats or Tickets.
- Before we save your department, we're going to choose which staff members will have access to the department from their staff control panel.
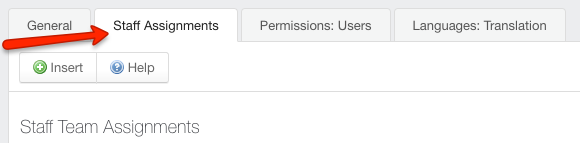
- Switch to the 'Staff Assignments' tab.
- From the 'Staff Team Assignments' section, click Yes next to any team you want to assign to a department.
- From the 'Individual Staff Assignments' section, click Yes next to any additional staff members you want to assign.
- If you want only a particular set of users to be able to select the department when submitting a ticket from the support center, you'll find options for that on the 'Permissions: Users' tab.
- If you offer support in multiple languages and you'd like to add translations for the department name, you can do that from the 'Languages: Translation' tab.
- When you have your department fully configured, click the Insert button to save your department and start using it in your helpdesk.
- Once you've created a department, you can come back and edit any of the settings above by clicking the Manage Departments link in the toolbar:

And that's it! You are now equipped to keep your queue organized with different departments for different types of support requests.
Sandeep Kaur