Although Kayako Classic has a lot of default options for looking at your queue, sometimes they don't give you quite the perspective you're looking for. For those situations, ticket views and filters can get you the clarity you need.
By setting up views, which let you customize the columns and sort order for your ticket listings, and filters, which let you restrict which tickets Kayako Classic includes in the listing, you can look at any subset of your tickets you like.
Once you've created some custom ticket views, your team will be able to quickly switch between them when looking at your queue. From there, they can also select a filter from the top menu, to further restrict which tickets are displayed. Combining these two features lets you organize and prioritize your tickets based on virtually any ticket attribute.
In this article, we will explain how ticket views and filters work, and then walk you through creating and configuring your own views and filters.
Understanding how views and filters work together
In addition to Kayako Classic's default ticket listings, you can create your own, custom listings that let you slice and dice your ticket queue in whatever way is most helpful to your team. To get the most control over your queue, we recommend using a combination of two Kayako Classic features: views and filters.
Let's take a quick look at what these features offer, and how they differ and complement each other:
-
Views – Ticket views are way to save a specific configuration of columns to show when you're looking at your tickets. So, for example, you might be looking at your Support department tickets from the default 'All Tickets' view:
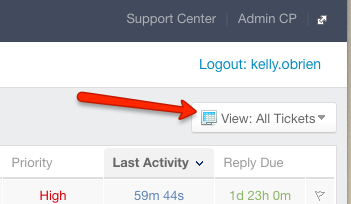
But maybe those columns don't give you quite the information you need, and instead you want a simpler breakdown of your queue. You could create a custom view named 'Staff updates', which will then be available from the View menu:
Views offer you a lot of flexibility in terms of not only what ticket information they display but also what default behaviors are associated associated with them. For example:
- Ticket assignment – You'll be able to select whether your view should include all tickets, only tickets assigned to staff member using the view, or only tickets that haven't been assigned yet.
- Visibility – You can choose how available to make the views you create, either by keeping them private, sharing them with your team, or sharing them with every staff member.
- Auto-assignment – For each view, you can decide whether Kayako Classic should change the owner of a ticket to whichever staff member replies to or forwards it, or whether it should simply leave the original owner intact.
- Default reply status – Kayako Classic can also automatically set tickets within a view to whatever status you choose, when someone responds to a ticket.
On the whole, views let you create a variety of lenses through which to view your ticket queue. From within each view, you can focus your attention even further, by adding...
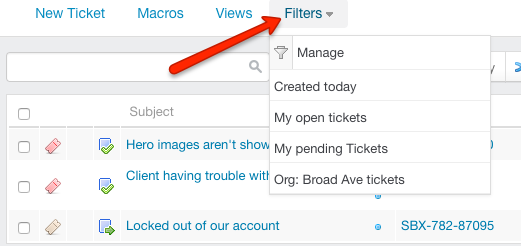
- Filters – Filters are a much more compact feature than views. Each filter is a collection of one or more criteria that you can apply to any view in Kayako Classic. When the filter is applied, the view will only display tickets that meet the filter's criteria. Some useful applications for this include filtering by User Organization, by Ticket Owner, by Creation or Last Reply date, or by any number of other ticket attributes.
Once you've created a public filter, your team will be able to select it from the top toolbar when looking at any ticket view:
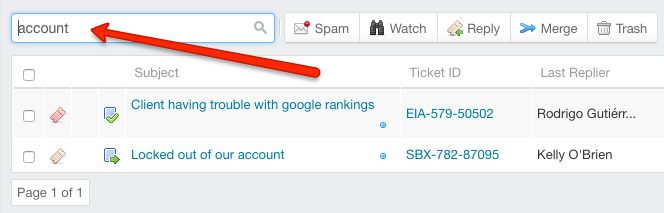
In addition to your saved filters, you can also quickly narrow down a view, using the quick search bar at the top of the ticket grid. Kayako Classic will search every ticket attribute for your search string and display the results.
So, between views, filters, and quick searches, Kayako Classic has options to help you quickly hone in on any particular subset of your ticket queue that you want to see.
Creating a new ticket view
You'll create views from the staff control panel. Once you've saved a view, depending on the visibility option you select, it will be able to your and your teammates from the Views dropdown.
NOTE: To create or edit views, you'll need a staff account with the 'Ticket views' permission.
To create a new ticket view:
- Sign in to the staff control panel.
- Click on Tickets in the header, then Views.
- On the next page, you'll be able to see any views you've already created. To create a new one, click the New button in the top right.
- First up, you want to add a descriptive Ticket view title so your staff know what they're getting, when they select a view.
- From the Display tickets assigned to section, select the types of tickets the view should include.
- Next, choose the Visibility level for the view, to share it with other staff members or keep it to yourself.
- To use this view as the default for one or more departments, check the box next to them in the Link this view with departments section.
NOTE: If there are two views linked to the same department, the view that was most recently linked will be the default. - Switch to the 'Options' tab, where you'll set some default behaviors associated with the view.
- From the Tickets to display per page option, set a number of tickets to display before breaking onto a new page.
NOTE: The number you set here cannot exceed the global page limit specified in the admin control panel. - Choose how often, if at all, you want to Automatically refresh the ticket listing.
- To automatically reassign any ticket in this view to whoever replies to or forwards it, set Automatically set ticket owner to active staff user to 'Yes'.
- From Default ticket status when replying to a ticket select which status tickets should have, when a ticket is forwarded or replied to.
- Select a default action you want Kayako Classic to take After a ticket has been replied to. You can opt to be directed to a few different views or tickets.
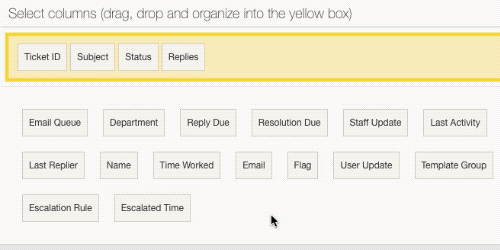
- Next, switch to the 'Columns' tab, where you'll get to choose the columns that define your view.
- First, skip down to the bottom of the page, and drag and drop the columns you want to see into the yellow box.
- Add as many columns as you like, and rearrange into whatever order suits the purpose of your view.
NOTE: If you've created any custom fields, you'll be able to add them as view columns. - When you have your columns selected, select a default Sort by column, and whether the Sort order should be 'Ascending' or 'Descending'.
NOTE: Don't worry too much about this, as you'll be able to sort your view on the fly as well, by clicking the column headers. - When you've got your view configured as you like, click the Insert button on the toolbar.

At this point, your team can start using this view whenever they want, by selecting it from the Views dropdown.
Adding ticket filters
Filters can be as simple or as complicated as you need them to be. You can add a single ticket criteria, or you can add an assortment of them. You'll also have a few options for who to make the filter available to.
NOTE: To create or edit views, you'll need a staff account with the 'Ticket filters' permission.
To create a new ticket filter:
- Sign in to the staff control panel.
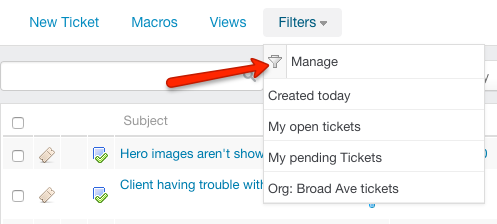
- Click on Tickets in the header, then Filters.
- From the menu, click Manage, to go to a page with a list of any existing filters.
- Click the New button in the upper right.
- Add a descriptive Filter Title, making sure to be explicit about what the filter will show you, when you select it.
- Choose whether to limit the filter's Availability to just you, or to Restrict it to specific staff team by selecting one from the dropdown.
- From the criteria dropdowns, select what criteria a ticket will have to match to be displayed in this filter.
- To add more than one criteria, select either 'Match all criteria (AND)' or 'Match any of the criteria (OR)' and click the Insert Criteria button.
- When you have your criteria set up, click Insert to save your filter.
You'll now be able to select this filter from the dropdown above any ticket view in Kayako Classic.
Ana Vukina