It is always recommended that you run the latest Kayako Classic Download release. The latest releases have the most recent bug fixes and security patches applied, keeping your helpdesk bug free and secure.
This article goes through the procedure for upgrading your Kayako Classic Download helpdesk to the latest version.
We'll also cover 'downgrading', i.e. switching from Fusion to Case or Engage, as the processes are almost identical. Note that even if we refer to the process as 'upgrading' throughout this article, know that it applies to both upgrades and downgrades.
NOTE: If you are upgrading from a release earlier than 4.50, please note that there have been some major framework changes which may break compatibility with third-party modules and plugins. Contact support if you are upgrading from an earlier version.
What to expect from the upgrade process
The upgrade process consists of three parts:
- First, you'll need to take a few steps to disable your helpdesk, so you don't miss any customer messages while your upgrading.
- Second, you'll make a complete backup of all your Kayako Classic files.
- If you're downgrading your helpdesk from Fusion to Case or Engage, you'll need to remove a couple of modules from your installation.
- Next, you'll install the new product files, add your backed up data, and run the upgrade script for your new version.
- Finally, you'll import the last bits of backed up data, and take your helpdesk online.
This process will take several hours, depending on the size of your database, during which your support center will not be available to your customers.
Before you begin
- Check that your license is current, which should include both your product license and your support subscription. To check the status of your license and subscription, log onto my.kayako.com and click on Orders.
- Make sure you have admin privileges for not only your Kayako Classic download instance but also the server you use to host it.
- Ensure that your server environment is up-to-date with Kayako Classic's requirements.
- Create a folder on your computer to save a copy of your data to, for example: [KayakoClassic_backup]
NOTE: You can name this folder whatever you like, but we'll be referring to it as [KayakoClassic_backup] throughout these docs.
Disabling your helpdesk
Take Kayako Classic offline
In order to prevent new data from being generated while you're upgrading, you’ll need to disable your helpdesk. You can accomplish this by creating a temporary page that will intercept visitors before they hit your support site, and let them know you'll be back online soon.
To set up your placeholder page:
- Create a simple .html page called 'index.html' with a message explaining that your support site is temporarily unavailable.
- Save your customized 'index.html' file, and any image files it uses on your local machine.
- Log onto your server and navigate to your Kayako Classic root directory.
- Upload your ‘index.html’ file + images.
- In the same folder, find the ‘index.php’ file, which is your current support site homepage.
- Rename ‘index.php’ to ‘index_down.php’. This will ensure that no one can stumble upon your helpdesk while you’re updating.
- Open up a browser window and navigate to your support site. You should see the new 'index.html' page.
We also recommend renaming your 'cron' folder temporarily so that if you have a manual cron job set up, it won't ping your helpdesk during the upgrade.
To change the name of your 'cron' folder:
- Navigate to your Kayako Classic root directory, and find folder called 'cron'.
- Rename this folder to 'cron_disabled'. This will prevent any manual cron jobs you have setup from firing while you run your backups.
Disable your email queues
Next, you'll need to disable your email queues, so you don't miss any incoming requests while Kayako Classic is offline.
To disable your email queues:
- Log into the Kayako Classic admin control panel.
- On the menu sidebar, click Email Parser followed by Email Queues.
- For queues using POP3 or IMAP:
- Click the email address in the list.
- Under 'Email Queue Settings', next to Email Queue is Enabled select 'No'.
- Click the Update button.
- Any emails sent to these email addresses will now simply accumulate in the email inboxes while Kayako Classic is offline.
- For email queues using the 'Pipe' method:
- You'll need to log into the mail server for the address you're using to forward emails and disable mail forwarding while Kayako Classic is offline.
- You can then follow the instructions above to disable the queue within Kayako.
Make a complete backup of your Kayako Classic files
Back up your templates
Next, you'll need to create a backup of any templates you've modified in Kayako Classic so you can import them into your updated helpdesk.
To back up your templates:
- Go back to the Kayako administrative control panel.
- On the menu sidebar, click Templates followed by Import/Export.
- Next to Export Type, make sure ‘Export all templates’ is selected.
- Click the Export XML button and save your backup to your ‘[KayakoClassic_backup]’ folder.
Back up any language support files you’ve modified
Now, to back up any changes you’ve made to your language packs.
NOTE: If you haven’t customized any language packs, you can skip this section.
To create backups of your language packs:
- Go back to the Kayako administrative control panel.
- On the menu sidebar, click Languages followed by Import/Export.
- Next to Language to Export, select a language you’ve made modifications to, and click the Export XML button in the top menu.
- Save the XML file to your ‘[KayakoClassic_backup]’ folder.
- If you’ve modified other language packs, repeat the same procedure for each additional language.
Back up your file attachments and GeoIP folder
Next, you'll need to make a copy of two folders that store important information for your helpdesk:
- Using a file manager or the command line, log into your server and navigate to the Kayako Classic root directory.
- Open the '__swift' directory, and find the 'files' and the 'geoip' directories.
- Make a compressed archive of each of them and name them 'files_backup' and 'geoip_backup' respectively.
- Save the archives to your ‘[KayakoClassic_backup]’ folder.
Make a complete database backup
You'll want to make a complete backup of your Kayako Classic database, just in case something goes awry during the upgrade process.
- We recommend you use the command line to make your database backup, so pull up a terminal window and log into your server.
- Run the following command, filling in your details for each [placeholder], to save a local backup of your Kayako Classic database:
-
On Windows Environments:
mysqldump --databases [your database name] --user=root --password=[your password] > [filepath for your [KayakoClassic_backup] directory] \dump.sql
NOTE: If you try to run this command and it tells you the program cannot be found, you’ll need to navigate to the directory where the MySQL dump tool has been installed and run it again, usually ‘C:\”Program Files"\MySQL\"MySQL Server 5.5"\bin\mysqldump’.
-
On Linux Environments:
mysqldump -u [your username] -p[your password] [your database name] > [filepath for your [KayakoClassic_backup] directory] /dump.sql
NOTE: If you try to run this command and it tells you the program cannot be found, you’ll need to navigate to the directory where the MySQL dump tool has been installed and run it again. You can get there by typing ‘which mysqldump’ and then navigating to the path the command returns.
-
- Go to the target directory you specified, and check to make sure the 'dump.sql' file has been created successfully.
Downgrading only: Remove plan-specific modules
NOTE: If you're upgrading your helpdesk, skip to the 'Download, extract, and upload latest product files' section.
If you are downgrading from Kayako Classic Fusion to either Case or Engage, you'll need to remove a couple of modules from your installation, in order to make the changeover smoothly.
Downgrading from Fusion to Case
If you're switching from Kayako Classic Fusion to Kayako Classic Case, follow these instructions to disable/remove the live chat elements from your helpdesk.
Fusion-to-Case: Disable "Live Chat" icon
Disable the "Live Chat" icon featured on the Client Support Center, so that it no longer appears for the clients to click. To do that, login to the Admin Control Panel of the helpdesk and navigate to Settings >> Live Chat >> Client Support Interface Settings and set the option "Display Live Support Status Icon" to "No".
Fusion-to-Case: Uninstall "Live Chat" and OnSite modules
Login to the Admin control panel and click Apps under Options menu. The "Live Chat" module is installed and we need to uninstall it. To do so click on the "Live Chat" option and you will be presented with the uninstall page. You need to click "Uninstall" as shown in the following screen-capture to remove the "Live Chat" module.
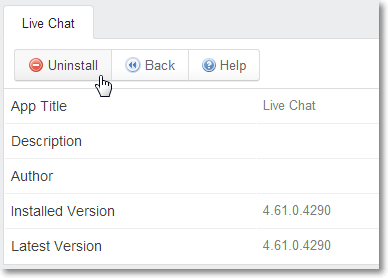
Follow the same procedure to remove the 'OnSite' module.
Fusion-to-Case: Removing "livechat" and "OnSite" directory
The "livechat" and "OnSite" directories are placed under the "__apps" directory need to be removed. If you don't remove them these options will still show up in the helpdesk, although the modules have already been uninstalled.
Downgrading from Fusion to Engage
If you're switching from Kayako Classic Fusion to Kayako Classic Engage, follow these instructions to disable/remove the email support elements from your helpdesk.
Fusion-to-Engage: Uninstall "Tickets" and "Mail Parser" module
Login to the admin control panel and click Apps under Options menu. The "Tickets" and "Mail Parser" module is installed and we need to uninstall it. To do so click on the "Tickets" option first and you will be presented with the uninstall page. You need to click "Uninstall" to remove the "Tickets" module.
Follow the same procedure to remove the 'Mail Parser' module.
Fusion-to-Engage: Removing "tickets" and "mailparser" directories
The "tickets" and "mailparser" directories placed under the "__apps" directory needs to be removed, otherwise it'll show up in the helpdesk, although the "Tickets" and "Mail Parser" modules have already been uninstalled.
Installing and configuring your helpdesk
Your next task is to get the new product files up and configured on your web server, and then run the upgrade script.
Downloading, unpacking, and uploading the product files
Your next step is to download the product files, extract them on your local machine, and upload them from there to your server:
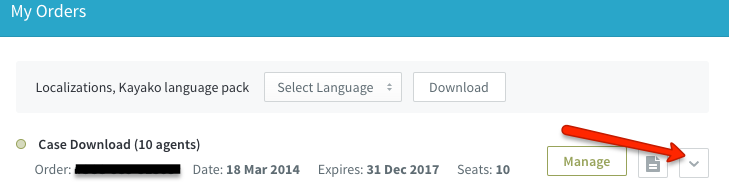
- Log into my.kayako.com and click on the arrow under 'My Orders' to see your product details:
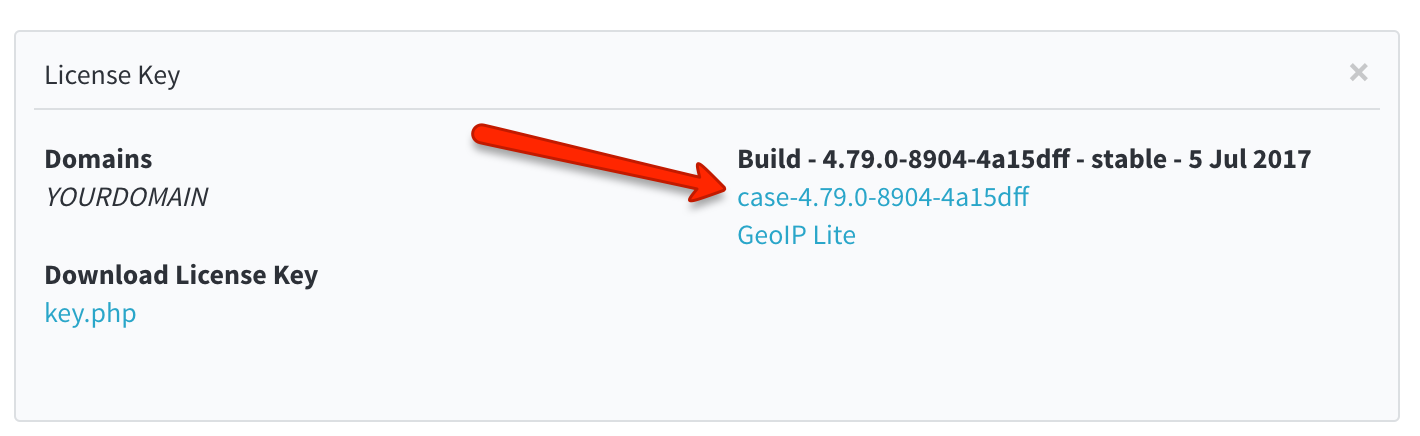
- Here you'll see all of the details of your license including a link to the product files:
- Click the link to the product and save the file to your machine.
- Extract the package locally.
- The extracted folder contains a sub-folder named 'upload', which contains all your helpdesk files.
- Using either the command line or an FTP client of your choice, upload all of the files from the 'upload' folder into the folder on your web server that you use to store your helpdesk.
NOTE: If you're using an FTP client, make sure you're uploading using binary mode.
Uploading your file attachments and GeoIP directories
The product files you uploaded come with empty directories for your 'files' and 'geoip' folders. You'll need to add your backed up data to those folders.
- Upload the archives of the 'files' and 'geoip' directories from your '[KayakoClassic_backup]' folder into the '__swift' directory on your server.
- Extract the archives.
- Copy the contents of 'files_backup' into 'files' and 'geoip_backup' into 'geoip'.
- Delete the archives and the empty '_backup' folders from your server.
Reconfiguring your helpdesk files
There are a few configuration steps you'll need to take with your product files before you run the upgrade script.
Rename 'config.php.new'
To avoid accidental overwriting of any existing 'config.php' files, the '__swift/config/' directory comes default with a files called 'config.php.new'. Provided you don't have any conflicting 'config.php' files, you'll need to rename this file to 'config.php' before continuing.
Edit 'config.php'
The 'config.php' file must be manually edited to match the configuration of your helpdesk's database connection.
The following variables in this file need to be edited:
$_DB["hostname"]– Needs to be set to the hostname of your Kayako Classic database.$_DB["username"]– Needs to be set to the username of your Kayako Classic database admin user.$_DB["password"]– Needs to be set to your database user's password.$_DB["name"]- Needs to be set to the name of your Kayako Classic database.
Here's an example of what the database details in your 'config.php' file should look like:
/**
* DATABASE HOSTNAME
*/
define('DB_HOSTNAME','localhost');

/**
* DATABASE USERNAME
*/
define('DB_USERNAME','kayako_user');

/**
* DATABASE PASSWORD
*/
define('DB_PASSWORD','support');

/**
* DATABASE NAME
*/ define('DB_NAME','kayako_fusion');
NOTE: The rest of the settings in config.php should be left unchanged unless you are very familiar with the system.
Once you're finished editing, save the file.
Upload 'key.php'
In order to activate the product, you'll need to download the key.php file corresponding to your registered domain from my.kayako.com and upload it to the root folder in which the rest of the helpdesk files have been uploaded.
Set file permissions
Kayako needs write permissions, recursively, for five directories:
- __swift/files
- __swift/cache
- __swift/geoip
- __swift/logs
- __apps
Please choose the section below that corresponds to your operating system if you are unfamiliar with changing permissions on directories.
NOTE: It is usually possible to change directory permissions using an FTP client, but that is out of the scope of this document. Please consult your FTP client's documentation to learn how to change a directory's permissions using that tool.
Unix-based servers:
On a Unix-based system, you'll use the 'chmod' command to set permissions to '777' on the aforementioned directories:
- Run the following command from within the '__swift' directory:
chmod -Rf 777 files cache geoip logs - Run the following command from within your Kayako Classic root directory:
chmod -Rf 777 __apps
Windows-based servers:
You'll need to make two adjustments, if you're running Kayako Classic on a Windows-based server:
- First, in the 'php.ini' file, you'll need to set the 'upload_tmp_dir' to 'C:\Windows\TEMP'.
- Open up your 'php.ini' file, search for 'upload_tmp_dir' and make sure it looks like this:
; Temporary directory for HTTP uploaded files (will use system default if not specified).

upload_tmp_dir = C:\Windows\TEMP
- Second, you'll need to set some specific folder permissions for Microsoft's IIS. For the user account of the application pool you're using for Kayako Classic, you'll need to grant full permissions to the following folders:
- files
- cache
- geoip
- logs
- __apps
- C:\Windows\TEMP
NOTE: Most of the time, the user account you'll need to assign will be 'IUSR', unless you've modified your application pool accounts. For help with this, refer to the IIS documentation.
Running the upgrade script
Whether you're upgrading your existing instance or downgrading from Fusion, you'll need to run Kayako Classic's upgrade script to make sure you're using the latest version of the product.
To run the upgrade script:
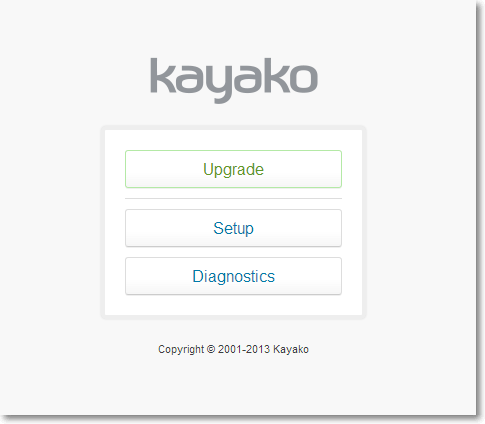
- Open up your browser and go to your Kayako Classic directory '/setup'. So, for example, https://www.yourdomain.com/support/setup. At that URL, you should see a page that looks like this:
- You'll be asked to review to the license terms, and click the Agree button.
- The setup utility will check to make sure your server meets all the requirements.
- When it's done, click Next to start the upgrade.
NOTE: The automated portion of the setup script may take quite some time. Do not interrupt it for any reason or your installation will be corrupt and you'll have to start over.
Once the upgrade is complete, you'll see a success screen, and you'll be ready to start reactivating your helpdesk.
Reactivating your Kayako Classic helpdesk
Reenabling your email queues
First thing to do, once the upgrade process is complete, is to capture any emails that came in while your helpdesk was unavailable. From there, you’ll be able to reenable all your queues so everything starts flowing again.
To reenable your email queues:
- First things first, you need to collect any emails from while you were away. Log into the admin control panel .
- On the menu sidebar, click Email Parser followed by Email Queues.
- Make a list of the queues you have set up to use the ‘Pipe’ method.
NOTE: You’re going to use POP3 to go collect any missed emails, but then you can set your queues back to using the ‘Pipe’ method, if you prefer. - For all of your queues, regardless of mailbox type:
- Click the email address in the list.
- Next to Mailbox Type select ‘POP3’.
- Next to Email Queue is Enabled select 'Yes'.
- Click the Update button.
- Repeat the steps above for all of your queues.
- Next, we’re going to schedule a custom task to force Kayako to fetch your emails:
- Over on the menu sidebar, click Scheduled Tasks followed by Manage.
- Scroll down and find ‘Fetch emails (POP3/IMAP)’ on the list and click the checkbox.
- At the top of the page, click the Execute button to run the task.
- Now that you’ve pulled in any messages you missed, you can reset your ‘Pipe’ queues:
- Log into the mail server for the address you're using to forward emails and reenable mail forwarding to your support address.
- Come back to the admin control panel and select the address from the list.
- Next to Mailbox Type select ‘Pipe’.
- Click the Update button.
- Repeat the steps above for any other ‘Pipe’ queues.
Restoring your templates
Your next step is to restore any templates that you'd modified prior to the update.
NOTE: If you didn’t modify or back up any of your templates, skip this section.
Restoring your template modifications from your backups takes a few steps. Follow the instructions in this user guide article to reimplement your template modifications.
Importing your language packs
If you created backups for your modified language packs, they’re next on the import list.
NOTE: If you didn’t modify or back up any of your language packs, skip this section.
To import your customized language packs:
- Still in the admin control panel, from the menu sidebar, click Languages followed by Import/Export.
- Select the ‘Import’ tab at the top of the page.
- Next to Template Group XML File, click the Choose File button.
- Navigate to your [KayakoClassic_backup] folder, select the language backup you created, and click the Open button.
- Click the Import button at the top of the page to finish the import.
- If you’ve modified other language packs, repeat the same procedure for each additional language.
Remove your placeholder page and 'cron_disabled' directory
Now that everything's up and running again in the background, it's time to take down the placeholder page you put up to divert people away from your support center. You can also remove the 'cron_disabled' folder, as you will have created a new 'cron' folder when uploading the product files.
To take down the placeholder page:
- Go to your Kayako Classic root directory.
- Delete the 'index.html' page you put up at the beginning of this process.
- Rename 'index_down.php' back to 'index.php'.
- Delete the 'cron_disabled' folder.
- Visit your support URL – you should see your Kayako Classic support center.
Last step! Rebuild support desk cache
To make sure your desk isn't hanging onto any outdated data that could interfere with things, you'll want to rebuild your cache. There are two steps to this: ;
- On your web server, go to the '__swift/cache/' directory and delete everything.
NOTE: These are temp files and will be replaced as soon as you complete step 2, below. - In the Kayako Classic admin control panel, click Diagnostics and then Rebuild Cache in the sidebar.
And that's everything! Congratulations on successfully bringing your Kayako Classic helpdesk up to date!
Kelly O'Brien