Running Kayako Classic on your own server gives you full control over your helpdesk, but also means you're responsible for maintaining it and your server as you go along.
In this article, we'll walk you through the steps necessary for installing Kayako Classic on your own server.
NOTE: Before installing Kayako Classic on your server, you'll need to check to make sure your server environment meets all of the requirements.
Downloading, unpacking, and uploading the product files
The first part of the installation process is to download the product files, extract them on your local machine, and upload them from there to your server:
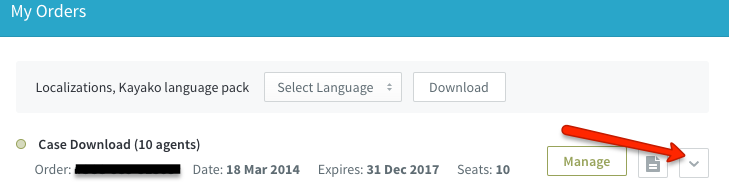
- Once you've purchased Kayako Classic, log into my.kayako.com and click on the arrow under 'My Orders' to see your product details:
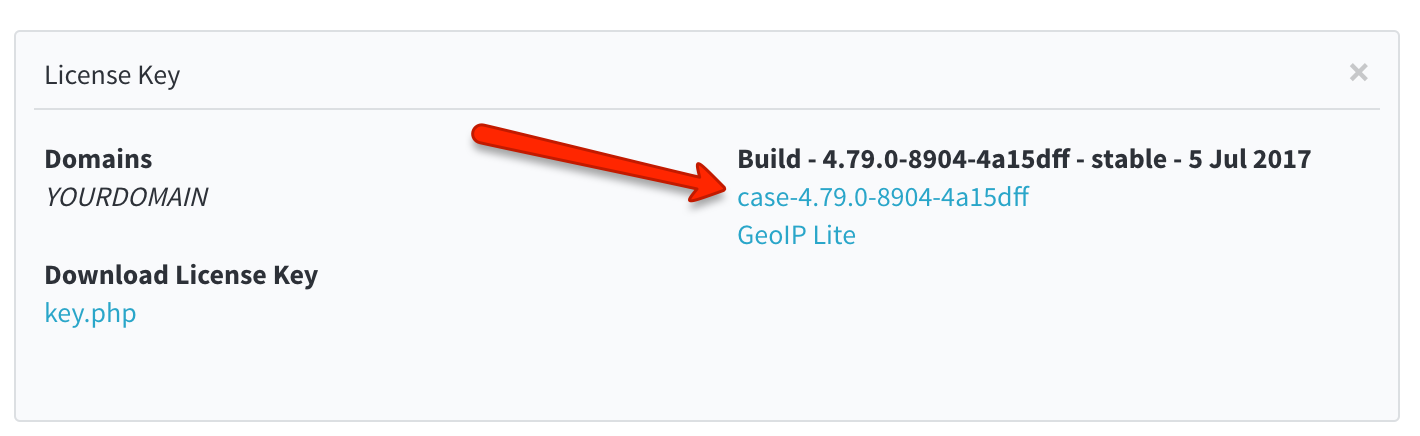
- Here you'll see all of the details of your purchase including a link to the product files:
- Click the link to the product and save the file to your machine.
- Extract the package locally.
- The extracted folder contains a sub-folder named 'upload', which contains all the files required to install your helpdesk.
- In the root directory of your web server, create a new folder for your Kayako Classic installation to live in and name it, for example, 'support'.
- Using either the command line or an FTP client of your choice, upload all of the files from the 'upload' folder into your newly created 'support' folder.
NOTE: If you're using an FTP client, make sure you're uploading using binary mode.
Now that the product files are up on your web server, it's time to do some setup on the backend.
Creating a MySQL database
You're next step is to create a new MySQL database on your server that Kayako Classic can use.
NOTE: You'll need root-level permissions to setup a new database on your server.
- If you're using the command line, you can use the following commands to create the database and user credentials you need.
CREATE DATABASE kayako_fusion;
USE kayako_fusion;
ALTER DATABASE kayako_fusion DEFAULT CHARACTER SET utf8 COLLATE utf8_unicode_ci;
GRANT ALL PRIVILEGES ON kayako_fusion.* TO 'kayako_user'@'localhost' IDENTIFIED by 'password_of_your_choice';
NOTE: You'll want to add an actual password in place of 'password_of_your_choice'
- If you're using phpMyAdmin or another graphical server configuration tool, you'll need to use their create database function to do the following:
- Create a new database called
kayako_fusion, set to useutf8_unicode_cifor its table collation - Add a new user to the database called
kayako_userwith a password of your choice - Specify
localhostwhen prompted for a host name - Grant all privileges to that user
- Create a new database called
NOTE: If you need help setting up your database, refer your server configuration tool's documentation.
With your database ready and waiting, there are a few last configuration steps you'll need to take.
Pre-installation configuration tasks
Before you can press the install button, you'll need to make a handful of changes to some of the Kayako Classic files you've uploaded to your server.
Rename 'config.php.new'
To avoid accidental overwriting of 'config.php' which is located in '__swift/config/' and contains important data, the default name for the file is 'config.php.new'. You'll need to rename it to 'config.php' before continuing.
Edit 'config.php'
The 'config.php' file must be manually edited for configuration of the helpdesk's database connection.
The following variables in this file need to be edited:
$_DB["hostname"]– Unless you supplied a different hostname when creating your database, this variable should be set to 'localhost'.$_DB["username"]– Unless you supplied a different user name when creating your database, this variable should be set to 'kayako_user'.$_DB["password"]– The variable should be set to the password that you supplied when setting up your database user.$_DB["name"]- Unless you supplied a different user name when creating your database, this variable should be set to 'kayako_fusion'.
Here's an example of what the database details in your 'config.php' file should look like:
/**
* DATABASE HOSTNAME
*/
define('DB_HOSTNAME','localhost');

/**
* DATABASE USERNAME
*/
define('DB_USERNAME','kayako_user');

/**
* DATABASE PASSWORD
*/
define('DB_PASSWORD','support');

/**
* DATABASE NAME
*/ define('DB_NAME','kayako_fusion');
NOTE: The rest of the settings in config.php should be left unchanged unless you are very familiar with the system.
Once you're finished editing, save the file.
Upload 'key.php'
In order to activate the product, you'll need to download the key.php file corresponding to your registered domain from my.kayako.com and upload it to the root folder in which the rest of the helpdesk files have been uploaded.
Set file permissions
Kayako needs write permissions, recursively, for five directories:
- __swift/files
- __swift/cache
- __swift/geoip
- __swift/logs
- __apps
Please choose the section below that corresponds to your operating system if you are unfamiliar with changing permissions on directories.
NOTE: It is usually possible to change directory permissions using an FTP client, but that is out of the scope of this document. Please consult your FTP client's documentation to learn how to change a directory's permissions using that tool.
Unix-based servers
On a Unix-based system, you'll use the 'chmod' command to set permissions to '777' on the aforementioned directories:
From within the '__swift' directory:
chmod-Rf 777 files cache geoip logs
From within your Kayako Classic root directory (e.g. 'support'):
chmod-Rf 777 __apps
Windows-based servers
You'll need to make two adjustments, if you're running Kayako Classic on a Windows-based server:
First, in the 'php.ini' file, you'll need to set the 'upload_tmp_dir' to 'C:\Windows\TEMP'.
Open up your 'php.ini' file, search for 'upload_tmp_dir' and make sure it looks like this:
; Temporary directory for HTTP uploaded files (will use system default if not specified).

upload_tmp_dir = C:\Windows\TEMP
Second, you'll need to set some specific folder permissions for Microsoft's IIS. For the user account of the application pool you're using for Kayako Classic, you'll need to grant full permissions to the following folders:
- files
- cache
- geoip
- logs
- __apps
- C:\Windows\TEMP
NOTE: Most of the time, the user account you'll need to assign will be 'IUSR', unless you've modified your application pool accounts. For help with this, refer to the IIS documentation.
Installing your Kayako Classic helpdesk
Now that your server is prepped, you're ready to start the installation itself:
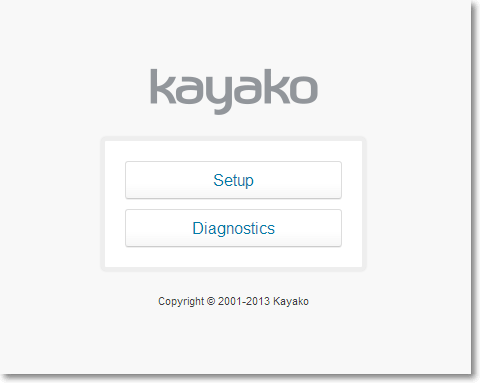
- Open up your browser and go to your Kayako Classic directory '/setup'. So, for example, https://www.yourdomain.com/support/setup. At that URL, you should see a page that looks like this:
- Click the Setup button to begin the installation process.
- You'll be asked to agree to the license terms, and then the setup utility will check to make sure your server meets all the requirements. When it's done, click Next.
- Your next step is to create credentials for your default administrator account and supply some important details for your helpdesk. The Product URL should the publicly accessible URL of your helpdesk, e.g., 'https://yourdomain.com/support/'.
- When you've filled in the details, click Start Setup to begin the automated setup procedure.
NOTE: The automated portion of the setup script may take quite some time. Do not interrupt it for any reason or your installation will be corrupt and you'll have to start over!
Once setup has completed, you'll see a success screen, and you'll only have one more step before you're ready to start using Kayako Classic!
IMPORTANT: Removing the /setup directory
Once the setup process has completed successfully, you'll need to remove 'setup' directory from your server, as a security measure. You will receive warnings if you do not delete it.
And that's it – congratulations on installing Kayako Classic Download!
Kelly O'Brien