Kayako Desktop provides you with a platform to interact with your site visitors and manage your support chats effectively. By connecting Kayako Desktop to your Kayako Classic domain, you can manage live chat requests that come in through the chat widget on your support site.
Kayako Desktop provides your support team an all-in-one tool for offering real-time support, including live chat, simultaneous conversations, visitor monitoring, support for multiple Kayako Classic instances, and much more.
Kayako Desktop comes in two flavors: one for Windows, one for Mac OS X. This article is about Kayako Desktop for Windows (KDFW).
NOTE: For help with Kayako Desktop for Mac, visit our KDFM article.
In this article we'll give you an overview of how Kayako Classic interacts with KDFW and then walk you through how to accept and join chat conversations.
Understanding how Kayako Classic and KDFW work together
Any agent that's going to be offering chat support will need to install KDFW and connect it to their Kayako Classic account. From there, they'll be ready to accept chat requests from your site visitors.
Anytime a new chat request comes in, KDFW will send your team a notification. Once an agent accepts the chat, they can interact with the customer directly. They also have the option to join ongoing chats or initiate chats proactively, from the visitor list in KDFW's main window.
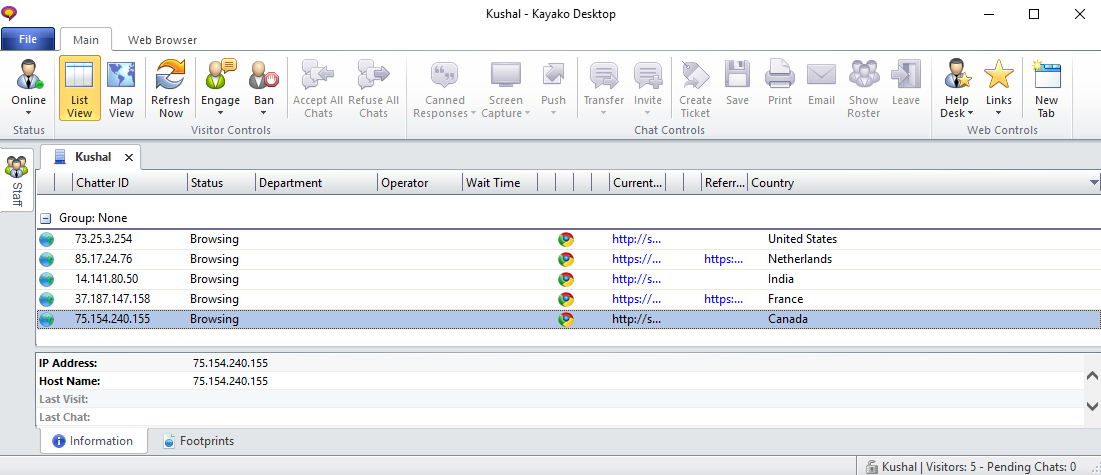
Any chats that come in, whether an agent accepts them or not, will appear in under 'Live Support' in the staff control panel. Every message that goes back and forth will be added to the chat history.
Now that you have a sense for how KDFW and Kayako work together, let's look at some of the common tasks you'll be using KDFW for.
Accepting or rejecting a chat request
When a customer initiates a chat, one of your support agents who's online in KDFW will receive a chat request pop-up:

You can see the customer name (Adam) and chat subject in the pop-up.
If you click Accept, you'll start a conversation with the customer. If you click Decline, chat request will be routed to next available agent.
Joining an ongoing chat
In addition to accepting new chat requests, you can also join ongoing chats from the main KDFW tab.
To join an ongoing chat:
- Log into Kayako Desktop for Windows.
- The first screen you'll see is the 'Visitors' screen. Find the chat you want to join and right-click.
- Hover over the 'Join' option.
- From here, you have two options:
- Join Chat — Click this option to join the chat and be visible to both the other agent and the customer.
- Join Chat as Observer — Click this option to join the chat as an observer, you will not be able to participate in the conversation and the only staff member will aware of your presence.

Sending files from a chat window
Are you in a chat with the customer and want to share a file on the fly? Don't worry, no channel-switching required. KDFW lets you send many different types of media. When you share a file with your customer, it will appear in their chat window, where they download it. Any files you send over KDFW are secured by the same measures that protect the rest of your Kayako Classic account.
Below, we'll go through the different types of files you can send.
Sending an image
- From your chat window, above the reply text box, click the Send an image button.
NOTE: You'll can also send an image from the Push menu on the toolbar. - From the 'Push image' window, you'll have two options:
- Upload an image from the local system — Choose this option to upload an image file from your computer.
- Send an online image — Choose this option to send an image to the customer using the URL for that image
- Add your image and click the OK button to send the image to your customer.
Sending a file
- From your chat window, above the reply text box, click the Send a file button.
NOTE: You'll can also send a file from the Push menu on the toolbar. - In the 'Push file' window, click Browse.
- Find the file you'd like to send and click OK.
- Click the OK button again to send the file.
Sending a code snippet
- From your chat window, above the reply text box, click the Send example source code button.
NOTE: You'll can also send a code snippet from the Push menu on the toolbar.
- In the 'Push code' window, paste the source code you'd like to send.
- From the 'Language' drop-down, select the language respective to the source code you are sharing.
- Click the OK button to send the code snippet.
The customer will get the shared code in the chat window which can be copied to use further easily.
Sending a hyperlink
- From your chat window, above the reply text box, you'll see a Push URL text box.
NOTE: You can also send a hyperlink from the Push menu on the toolbar. - Type or paste the URL you want to link your customer to.
- Click the Send button to the right to send across a clickable hyperlink.
Kelly O'Brien